Sunday, September 29, 2013

KT Made It: Autumn Coffee Table Centerpiece

Two crafts in one weekend - what a treat! Even more exciting is the fact that I didn't have to go out for supplies for this project since it was made from the left over flowers from my autumn dining room table centerpiece (see here!), an empty soup can, left over scrap book paper, some yarn and old wine corks that my mom gave me for some crafty up-cycling!

What you need:
Wine corks
Knife to cut the corks
Hot glue
Flowers
1 soup can
Decorative scrapbook paper
Mode podge


I started off by cutting each cork into 6-7 slices, trying to make the slices as equal in width as possible. I was not sure how large I was going to make the mat when I first started, but I ended up slicing at least 35 corks. 

I used 7 slices to make a flower shape, with one slice in the middle and 6 slices placed evenly around the center. I hot glued the pieces together, totally to 29 total flowers. 
After a little tinkering, I arranged the flowers in a design so that at least 3 pieces of each flower were touching the pieces around it. Patiently, I hot glued the 29 flowers together


The next step was to make the floral arrangement. I started with my empty soup can. First, I cut two strips of the scrapbook paper, one for the top of the can and one for the bottom. I modge-podged the strips on, first using the modge podge to attach the paper and then going over the top of the paper to it a glazed finish. 

Next, I wrapped my yarn tightly around the center of the can that was not covered with the paper. 

Finally, I arranged the leftover flowers in the can!

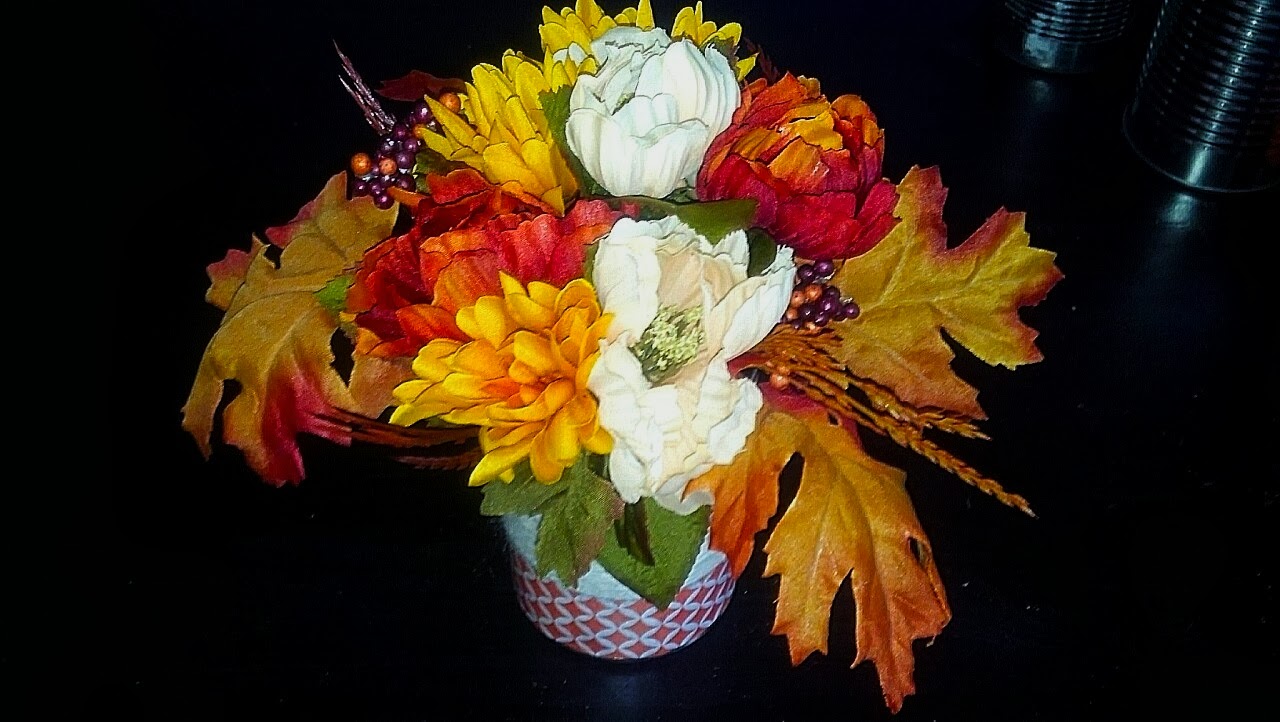
And that's my autumn centerpiece for my coffee table! 


Saturday, September 28, 2013

KT Made It: Autumn Table Runner and Centerpiece

Fall is such a beautiful time of the year! The cool weather, the changing colors of the leaves, and the start of pumpkin season are a few of the reasons that I get excited for the end of September (not to mention the anticipation of the holiday season coming close behind). Even more exciting this fall is the prospect of sharing my seasonal crafting and baking with all of you! So to kick of the autumn season, I came up with something festive to put on display - a table runner and centerpiece for the kitchen table.

First, I started off making my table runner in a similar fashion to the one that I made back in August (Table Runner). 

What you need:
2 yards of decorative fall fabric
Thread to match
This is the fabric that I used, which was a gift from my mom who is a quilter and crafter herself. The larger panel in the fabric has leaves and acorns.

I started by cutting four panels, one for the length of the table and one for the width. I cut the panels so that there was 6 and 5/8" hanging off the edge (the 5/8" was the seam allowance). Each panel was 12" wide with 3/4" seam allowance added to either side. First, I put turned the fabric so that "right" sides were facing each other. At the end of the panels, I folded each piece of fabric into two triangles. Next, leaving one side of the panel open, I sewed one side, making my way around the opposite end and then up the other side of the panel, again leaving that end open. Then, I pulled the panel inside out so that the "right" side of the fabric was showing. After ironing the panel, I closed the open side by hemming along the edge of the end of the panel, and then continued to hem around the entire panel to give the edge a finished look. 


Now that the table runners were complete, I started my centerpieces.

What you need:

  • 1 large floral wreath, 2 small 
  • Assortment of autumn flowers and leaves
  • Floral wire
  • Felt
  • Hot glue
  • Candles
First, I used floral wire to connect the three wreaths, with the two small wreaths on the outside. 

Starting with the large wreath, I arranged the leaves and flowers around the wreath by starting at one side and making my way around the wreath in a counterclockwise fashion. Next, I moved on to the two smaller wreaths. 

Then, I cut out 3 circles from the brown felt and hot glued the circles to the backs of the wreaths. 
And the final step...

Candles!


Friday, September 13, 2013

KT Made It: Hanging Wall Photos

For the past few weeks I've received several texts from my BF and fellow craft-enthusiast, Stephanie, who continues to inspire me with her projects - and motivate me to take a few minutes to breathe some fresh air and do a little crafting of my own in the midst of my busy week.  So today I am really excited to share this week's crafting did-it: hanging wall photos! This project is something I've had on my mind for some time, especially as I've been studying on the couch with a blank white wall in front of me. And of course there is also the fact that we have zero pictures from our beautiful wedding anywhere in the apartment (oops!) These are SUPER easy to make - they involve only a few supplies and they take very little time to put together. A great present for a loved one for the kind-of-not-so-distant holidays (and my favorite time of year)!

What you need:

  • Three 8x10" art boards (you can also use canvases or wood blocks)
  • Three 8x10" printed photos. (I printed mine on glossy paper at a local Walmart)
  • Modge podge
  • Modge podge brush applicator (a paint brush or sponge works just as well)
  • Ribbon
  • Hot glue


First, apply modge podge to the surface to which you are going to attach your photo.


Next, center your photo onto the art board so that the edges line up. I used a tissue under my hand and pressed the photo onto the board to make sure that it was glued on without any wrinkles or bubbles (and avoided putting too many finger prints on the picture!).

Using your applicator, apply the modge podge to the photograph in even strokes. I used vertical strokes, and applied two coats, allowing each to dry before applying the next.


While the modge podge was drying, I painted the two letters I bought (one more me, and one for Eric) that I planned to attach to ribbon from which the photos were hanging. Our wedding colors were brown and red, so I painted the letters brown (since I had red ribbon).
 

 To hang the photos, you need two pieces of ribbon per photo, each ~2ft long to be able to tie a nice bow. Glue the end of the ribbon 1-2" from either side of the back of the board.


To finish, tie the ends into a bow and hang on a nail or push-pin! I hot glued the letters into the bow for a final romantic touch :)


Easy, fun, and beautiful! I'm thinking of adding two more...there's still a little room left on the wall and a lot of pictures left to hang.

Happy crafting!

Saturday, September 7, 2013

KT Cooked It: Breakfast Veggie Egg Bake

Breakfast is unquestionably my favorite meal of the day! So after my run this morning, I scavenged the refrigerator looking for some ingredients to make something better than the protein shakes and apples that I've been eating for breakfast all week. Lucky for me there were still some veggies in the produce bin that desperately needed to be used, and a lot of eggs available too. Instead of going for an omelette (boring!), I decided to make an egg bake like my mom does every Christmas morning. I mean, how hard could it be? As it turned out, not hard at all, and super yummy!

I started off with some baby zucchini (about 10 of them), 15 cherry tomatoes, and 1/4 of a red onion. I julienned the zucchini (cut them into thin, long strips similar to matchsticks), cut the tomatoes in half, and sliced the onion.

Next, I sauteed the veggies in 1tsp of olive oil. I added ~1tsp each of garlic salt, onion powder, and freeze dried dill weed to the pan for some flavor. I cooked the veggies until the zucchini was tender.


In each of two 9" round pans I mixed 4 whole eggs and 1 cup of egg whites. Then I divided the sauteed vegetables between the two pans, and added 1cup of frozen chopped spinach to each. I also added 1/2 cup of fat free mozzarella cheese to one of the pans. Finally, I baked them in the oven at 400 degrees for about 10 minutes/until they were cooked all the way through.


Easy and delicious with left-overs to spare for the week!

Happy cooking, crafting, eating, and living!

Sunday, September 1, 2013

KT Cooked It: Stuffed Mushrooms

Hello again! It's finally time for another Katy-did-it blog post (thank goodness!). This past week was my first week of my internal medicine rotation, so the time for crafting, cooking, reading, etc. has significantly decreased. No matter! I made a commitment to myself to try to do at least one new thing a week, and I'm sticking to that for myself and my viewership, so thanks for following my did-its!

This week's did-it came from an invite to my sister and her husband's home for a little family get-together. Like my mother, my sister is an amazing cook and hostess. From desserts to her famous "Mama Jessie" alfredo and tomato spaghetti sauces, she pretty much does it all! So I was in a pickle as to what to bring. On top of that, I'd been trying to get through all of the veggies in my fridge before going to get more since they seem to be going bad rather quickly now that I'm back in clinic and have little time to make dinner every night. Lucky for me, I had some white mushrooms needing to get eaten and a favorite recipe in my head acquired years ago from a friend of a friend...so here it goes!

Ingredients:
8 large white mushrooms
1/2 white or sweet onion
1 clove of garlic
Grated parmesan cheese
Olive oil
Italian herb blend
 
First, I made the mushroom caps by cutting around the stems in a circle, then pulled them out. Yup! That easy!

Next, I finely chopped the removed stems, as well as the onion, and then minced the garlic. I put all of the chopped vegetables in a mixing bowl, and added about 2Tbl of parmesan cheese. My sister had an italian herb blend, as well as oregano and basil. I added about 1Tbl of each and a little bit of salt.

I heated the skillet on high with about 1Tbl of olive oil, then sauteed the mixture until the mushrooms and onions were tender. I put 1 scoop of the mix into each of the mushroom caps, and roasted the mushrooms in the oven for 8 minutes.

Quick, easy and delicious!