Friday, August 23, 2013

KT Made It: Wreath

Let's face it: hobbies cost money! That includes arts and crafts. It doesn't matter how many Michael's 40% off coupons one seems to accrue - the fact of the matter is that the materials can be expensive! As such, I am making an effort to use up as much of the paper, fabric, yarn, and ribbon that I have in our house to forward my crafting ambitions.

My newest project was inspired by a recent trip to HomeGoods. Sometimes just walking around that store is enough to improve my mood - all of the cute stuff in there just makes me feel happy! It also turns out to be the perfect place to go searching for some creative inspiration. While I was there, I saw a wreath covered in rolled paper roses. Despite being a not-so-cute color of rust orange (meh!), I saw it and knew that I could make a pretty wreath for much less than $16.99 and in a much better color too. When I got home, I rummaged through the scraps of paper and fabric that have been building up in small piles throughout the house over the past few weeks. That's when I found the remaining light blue damask and solid red fabrics left over from the table runner that I made for the dining room a few weeks ago. I decided to make a wreath the hang in the dining room from the same fabric, and here is what I came up with...

What you need:
-Styrofoam wreath
-2 (or more) fabric patterns/colors, one for wrapping around the wreath and the other(s) for the roses
-Satin ribbon to hang the wreath
-Scissors
-Hot glue
-Needle and thread


First, I cut 1"wide strips of the damask fabric to wrap around the wreath. I hot glued the end of the first strip to the wreath, then began wrapping the strips around the wreath tightly, slighting overlapping the fabric. I hot glued the end of each new strip to the one before, and completely wrapped the wreath with the fabric.


Once the wreath was completely wrapped, I began working on the roses. I began by cutting 2"wide strips of red fabric that were ~22" in length. I wasn't sure how many roses I was going to need, but I ended up with about 20. To make the rose, I folded the fabric in half lengthwise, then made a running stitch along the length of the fabric leaving the end untied in order to scrunch the fabric.


After scrunching the fabric, I started at one end and began rolling the fabric strip lengthwise to form the rose. I added stitches as needed to keep the layers in place. Once the roses were made, I sewed them to the fabric wrapped around the wreath, concentrating them on the lower right side to give an asymmetric look. 
 

Next, I measured the length of satin ribbon that I wanted in order to hang the wreath. I made the length long enough to be able to tie a bow at the ends. I also cut an additional piece of ribbon to wrap around the wreath to hold the ribbon used for hanging the wreath in place. To attach the ribbon, I hot glued about 4-5" at the center of the ribbon to the top of the wreath. I then began wrapping the extra piece of ribbon around that which I had glued similar to the way that the fabric was initially wrapped around the wreath. Finally, I tied the ends of the ribbon into a bow.
 

After hanging the wreath, I decided to add a few extra roses to the top left of the wreath to balance out the roses at the bottom. And then I was done!


Wednesday, August 21, 2013

KT Ate It: Cupcake Blvd in Crofton, MD

If you know me well, you also know that I have a weakness for sweets and grew up in a home with a mother who makes the most delicious cakes you are likely to ever come across (and therefore I blame her for my sweet tooth, sorry mommy!). As such, it was only a matter of time that I would give into my temptation and venture into Cupcake Blvd, a very small cupcakery nestled into the back corner of a relatively new shopping center in Crofton, MD. I've driven by it so many times, usually on my way back from the gym, which is the worst time to eat cupcakes - talk about counteracting everything you just worked for. But, alas, I knew that someday I would have to try a cupcake (or two) from that cute little shop tucked away, quietly calling me to take a bite of sheer sugary deliciousness.

My little sister/cupcake accomplice, Joy and I took a trip to Cupcake Blvd yesterday to try the treats, and we were not disappointed. The bakery is cute, painted in light blue with one small counter and display case for the treats made that day. Like many gourmet cupcake shops (ex. Georgetown Cupcake), they have 5-6 flavors of the day plus "everyday flavors" ready for indulgence. So we grabbed a box of 6 cupcakes for a little sampling, including: Vanilla, Snickerdoodle, Neopolitan, Salted Caramel (their best seller), Cookies & Cream, and Peanut Butter.


Overall, the cupcakes were very good - the cake itself was moist, and the frosting very tasty. However, there was way too much frosting for me, or maybe the frosting was just too rich to be able to actually eat all of it. Peanut butter and chocolate are probably my two favorite things ever, so that was my favorite, but I also tried the salted caramel which was amazing! Joy enjoyed the cookies & cream, and agreed that the salted caramel was the best of the ones we tasted. Per my hubby, the snickerdoodle and neopolitan were delicious, but also very rich. I'm still waiting on a review of the vanilla from him.

The moral of the story: Cupcake Blvd makes very good cupcakes, but if you aren't a fan of cake (or frosting), don't waste your $3.00/cupcake. If you are going to indulge, Joy and I recommend the salted caramel :)

Monday, August 19, 2013

KT Cooked It: Chłodnik

A WHAT is she cooking? Don't worry, there is a background story!

During the two weeks that I spent in Poland with relatives, my cousin and his wife made sure that I had an authentic experience, which included eating traditional Polish dishes. Of all of the food that I tried, I was most impressed with Evelyn's cold beet soup, or chłodnik. Chłodnik (pronounced phonetically "hu-WADH-nyeek") is a popular refreshing soup eaten during the summer, and is similar to barszcz (borscht) eaten throughout central Europe. Or you can think of it as the Polish version of gazpacho!

Trust me when I say that the idea of "cold beet soup" was initially stomach churning to me. But, not being one to turn down a new dish, I tried the soup and was pleasantly surprised. Like most Polish food that I have eaten, chłodnik is not overpowered with spices or seasonings, instead relying on the savory flavors of vegetables and some fresh dill.

Unfortunately I don't have a family recipe for chłodnik. However, there are innumerable blogs and websites with various versions of the soup. After browsing through 4 or 5 of the best reviewed recipes that I could find, I made my grocery list and set off to work making my first ever batch of chłodnik!

Ingredients
  • 4 beets with stems, peeled and chopped
  • 1 cup unsalted chicken stock
  • 1 large cucumber, grated
  • 6 radishes, grated
  • 2 green onions, chopped
  • 1 pint low fat buttermilk
  • 1/2 cup low fat sour cream
  • 3 Tbl fresh dill
  • 3 eggs, hard boiled eggs


First, I cut the beets from their stems, and then peeled and chopped the beets into small cubes. Other recipes called for julienning the beets if you prefer that. Also, BE WARNED - beets will stain your hands, counter, clothes, etc. So don't wear anything nice while chopping your veggies, and wash your hands frequently to prevent them from turning purple!


Next, I chopped the beet stems into small sections. Some recipes also included cutting up the beet leaves, but that seemed odd to me (because eating cold soup is so routine?) so I excluded that part. 


Then I placed the chopped beets and stems into a pot. I covered the vegetables with water, then brought the beets and water to a boil until the beets were tender, which took about 15 minutes. I added the chicken stock, and then set the mix aside to cool. 


While the beets cooled, I chopped the green onions and grates the cucumbers and radishes. 


Next, I whisked the buttermilk and sour cream, then added the dill. I placed the mix in the refrigerator to keep it nice and cool!

While the mix was cooling, I hard boiled my eggs and chopped them into slices once they were cool.


Once the beets were cool enough, I began to mix my soup together, starting with combining the milk and cucumber mix. Finally, I added the beets and I had my first batch of chłodnik ready to eat!


And here you have a delicious, refreshing chłodnik ready to eat! This recipe was really easy, and SO good...and it made quite a bit of left-overs too :) 


Smacznego! Bon appétit!

Sunday, August 18, 2013

KT Painted It: Pop Art

Drawing and painting are two of my favorite past times, particularly using watercolor pencils. Unfortunately, like any skill, art takes practice...which is not something I do often. Given the fact that I only have one week left of my vacation from school, it seemed to me that it was time to dust off the art set and workout some of those artistic muscles.

Well, it was a rusty start, but after a few sketches of flowers I decided to try a type of artwork that I have never attempted: Pop art. Pop art began as a visual art movement of the 20th century made famous by Andy Warhol who painted the notable Campbell's Soup Cans and Marilyn Monroe pop art portrait. 


I cannot really describe my process because I really had none, other than to look at various pop art pieces. I chose two photos of iconic figures, the first of Bette Davis and the second of Audrey Hepburn.  I knew that this would be challenging since I am NOT a portrait artist, but this blog is all about trying something new, even if I turn out to need some practice at it or if I flat out suck (which would certainly be the case if any of these experiences involved sports!)

In this end, these were my paintings. I had a lot of fun making them, and felt completely inspired to keep practicing this form, as well as to keep trying new types of art!


Saturday, August 17, 2013

KT Ate It: Cheesetique in Alexandria, VA

By no means would I consider myself a foodie, but I very much enjoy trying new dishes as well as cooking and baking when I have the opportunity. Luckily, my friend and fellow blogger Sara is a phenomenal cook and exploratory eater! So, on a recent trip to Alexandria, Virginia to visit, Sara took me to a local favorite for her and her husband: Cheesetique, the specialty cheese shop and wine bar

In a word, the shop in adorable - the front of the shop is similar to a deli selling cheeses, meats, wine and various breads and spreads including quince jam and honey. 


As you walk back toward the wine bar, there is certainly a transition in the ambiance, from quaint to elegant. The walls are lined with a bookshelf of empty wine bottles, and the dim lighting sets a relaxing mood. 


Sara and I enjoyed the five cheese plate with honey, marcona almonds and quince. Unfortunately, I did not note the kinds of cheeses that we tried (partially because I am new a reporting on my food adventures, and mostly due to the fact that I could not pronounce any of the items!).
Lucky for us, Sara was able to identify three of the five, including beamster 13, cotswold, and raw milk taleggio. Regardless, they were ALL delicious spread on the flat bread or bakery bread with a little honey or jam. 

For our meal, we shared the greek veggie fococcia and Cheesetique's award winning Mac n' Cheesetique! If you love cheese, the macaroni is absolutely something you should try. However, it is extremely rich...but makes great left-overs for a hungry hubby :)

Overall, Cheesetique was a wonderful dining experience that I recommend to anyone who enjoys trying something new, wine and cheese! 


Visit Sara's blog A Glimpse Into My Cravings for great cooking and eating ideas!

Happy dining and wining!

Thursday, August 15, 2013

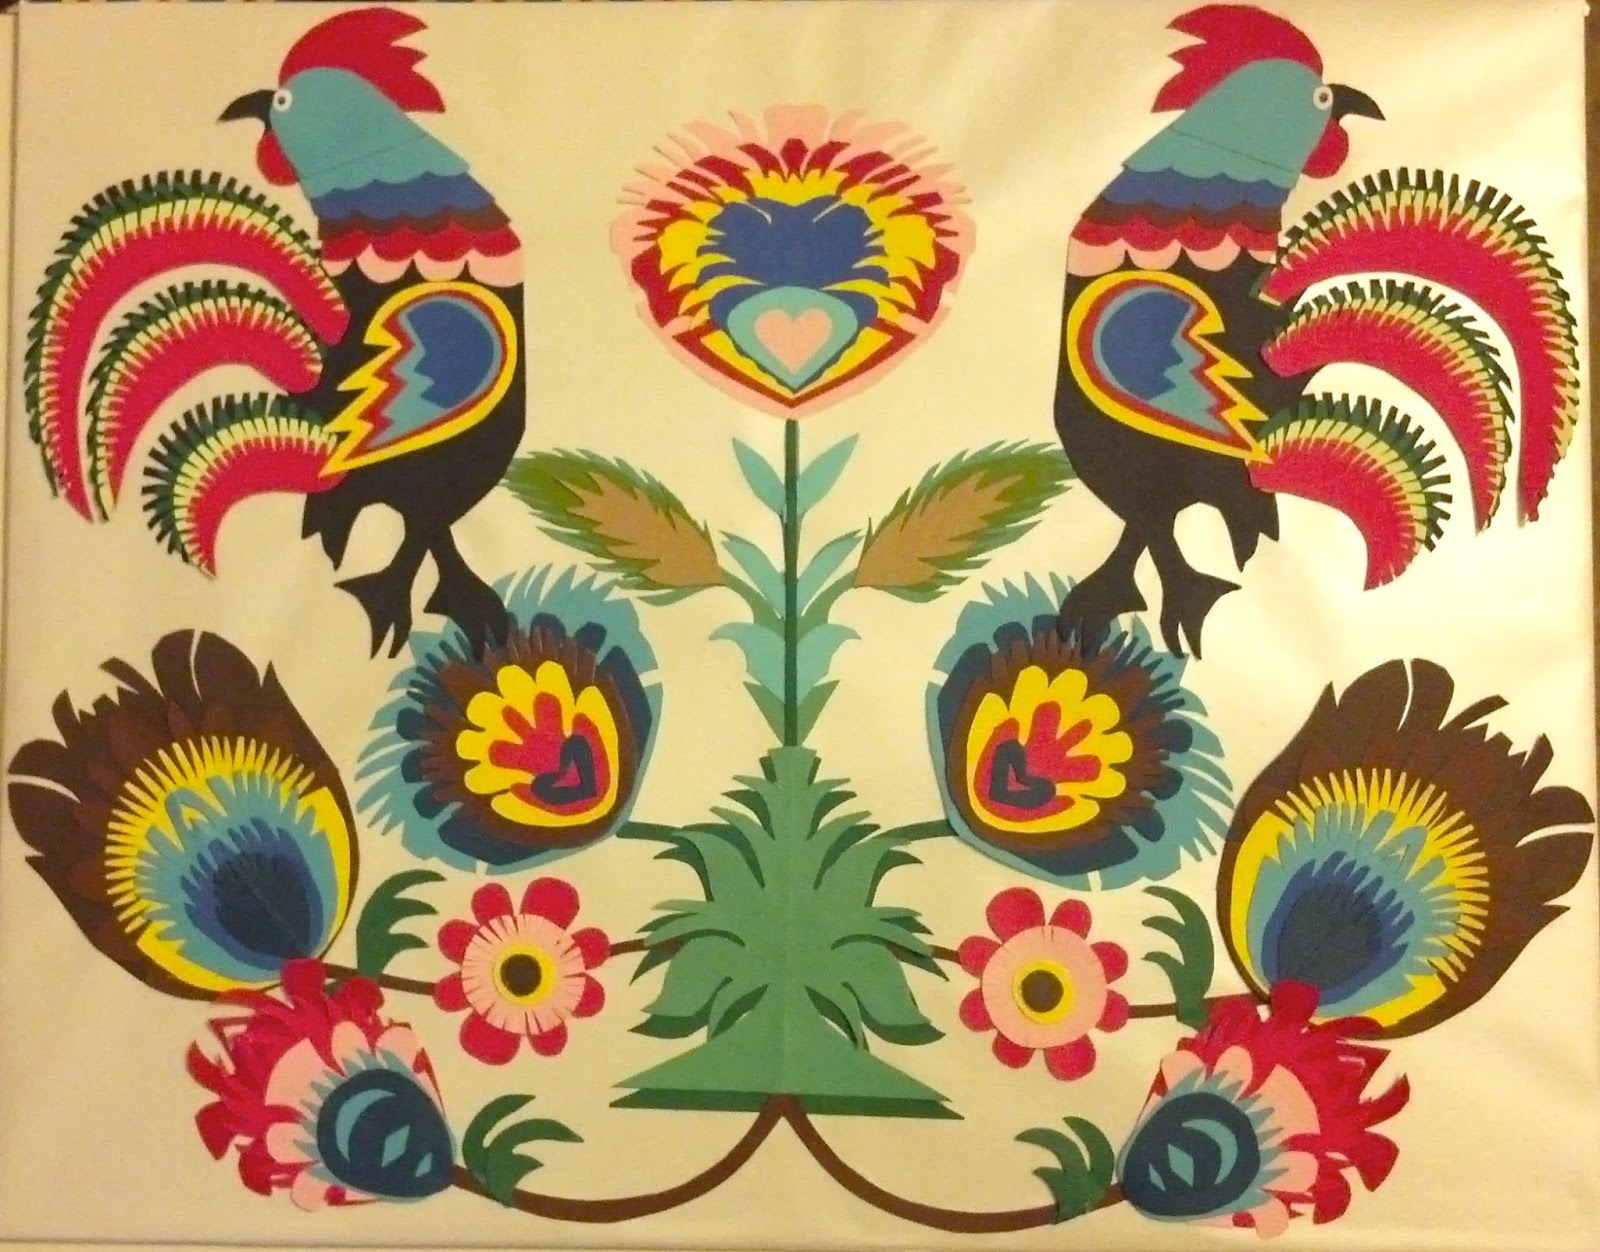
KT Made It: My First Wycinanki

Wycinanki (pronounced Vee-chee-non-key) are beautiful Polish folk art paper cutouts that became popular in the mid-1800s but continue to be made in rural Poland. They are made with multiple layers of colored paper that are folded, cut, and often embossed (nalepianki) in stylized patterns distinctive to the region in which they are made. For example, wycinanki made in the Kurpie region are typically one color, whereas those made in the Łowicz region are multicolored. Common themes include floral patterns, peacocks, roosters, circular or star-shaped medallians (gwiadzy), as well as annual Easter and Christmas motifs. Here are some examples:
 

My mother's parents, who immigrated from Poland after WWII often gave us wycinanki cards and had many decorative pieces in their home. I also saw them being made when I visited Gdansk while on a trip two-week trip to Poland after I graduated high school. Hence, the fascination for wycinanki and love for Polish folk art is well ingrained in me, and so it is only appropriate that I honor my heritage in my quest for arts-and-craftiness!

What you need:

  • Colored paper - I chose 8 colors for the flowers/rooster and 3 shades of green for the leaves that I repeated in different variations to give the piece a unifying spectrum of colors
  • Scissors
  • Craft or paper glue
  • Template for the flowers, birds, etc. I drew mine by hand, but you can find them on the internet as well. 
  • A picture frame or other piece to hang your design on, or you can make it into a card!
  • Inspiration and a lot of patience! 
 My wycinanki was inspired by the piece pictured in the center of the examples that I gave above, e.g. flowers and roosters! I began by drawing a flower as the central piece of my design. To ensure symmetry (which is a vital part of the craft), I drew half of the design along the folded line of a piece of green colored paper. I chose green simply because the part of the paper that might rip was most likely the stem and leaves, and that way I would get out of having to cut that piece again.


 Then I set out on making the flower. I used the original flower from the design I made as the larger bottom layer. I traced the outline of that flower, then drew by hand a smaller oval within that shape for the next layer, and repeated the same process for each layer of petals. Also, I made the petals of each layer a little bit different from the one before it.


And this is centerpiece of my design!

Next I set out on creating 3 flowers for each side of the design. I followed the same process as described for the first flower. First, I drew the larger bottom layer by hand on a folded piece of colored paper, so that when I cut it out there would be two identical flowers.


Then I took that cut out design, traced the outline, and drew the next flower to be a little smaller and also changed the petals. I also drew this on a piece of folded paper, which I cut out to have two identical flowers.
 

I repeated this process for a total of 5-6 layers for each of the three flowers that I made.


After I finished the flowers, I set out on making my roosters. I began by drawing a template of a rooster along the folded line of a black piece of paper.After cutting out the rooster shape, I began adding the feathers, beginning with the tail, then the head, and finally the wings. I ended up cutting the roosters into two separate pieces.


After finishing the flowers and roosters, I began arranging the pieces around the center flower. It took a couple of tries, but I finally arranged the pieces in an aesthetically appealing way. Then I made some stems and leaves to connect the flowers to the centerpiece. Finally, with the encouragement of my incredibly supportive hubby, we framed my first (of many future) wycinanki!


Thank you so much for visiting my blog! Please leave comments, questions, and suggestions for future posts :)

Przjemnego dnia! Have a great day!