Sunday, July 31, 2016

KT Made It: Pillowcase Dress

Now that baby girl is finally sleeping better and things are in a more "normal" routine, I am trying to make a little time for myself including working out, a little cooking/baking and a few crafts now and then. I don't anticipate that I will be blogging as much as I was in the B.C. (Before Children) era, but a few posts here and there is plenty these days!
A few weeks ago I made a pillow case dress for my little one. These are easy dresses to make for the novice sewer and for those of us with little time to cut out a complicated pattern.
There are a lot of instructions out there to make a pillowcase dress. Here are some of the ones that I found helpful:
Dress A Girl Around The World's "Best Dress Ever" Tutorial
Bumblebee Linen's Pillowcase Dress
Here a graphic that is also helpful.
Kristen Jordan Shamus: A small idea transforms an African community -- and one close to home | Detroit Free Press | freep.com:
I knew that I had only minutes to do each step while baby girl occupied herself here and there. She ate quite a few cheerios which I used to keep her busy while I made her dress. I used fat quarters instead of a pillowcase- two of one pattern for the dress bodice and one for the bottom panel. I bought one package of 1/2 inch ribbon for the drawstrings.

I made a pattern for the top of the dress, you can see the arm hole. I folded one polka dot fat quarter in half lengthwise and put the pattern piece along the fold. I cut the out the piece and added length to the bottom. I did the same with the second piece. This was the front and back of the dress.


I used the blue fat quarter to make a bottom panel of the dress.
Here are the four pieces of the dress. I spent quite a bit of time ironing out the folds...
Next, I sewed the sides together with the right-side facing in so that when the pieces were turned outward the right side of the fabric was facing outward and the seams were inside. I used a 1/2 inch seam allowance.

I do not have a surging machine or sewing machine foot, so I used pinking shears to trim the seams before pressing them with the iron. Then I sewed the seams in place.
To attach the bottom panel I turned the top of the dress right-side out and with the bottom panel seams facing outward line up the bottom hem of the dress and the top of the bottom panel. I sewed these together with a 1/2inch seam allowance.


After that I pulled to bottom panel so that the right side of the dress was facing out and then pressed the seams.
Next, I turned the dress inside out and then I folded the bottom panel in half with the "wrong side" facing together.

I made sure that there was about 1 inch of fabric above the seam that connected the two pieces of the dress. I folded the 1piec" hem inside creating a finished seam, which I then sewed in place.


With the dress sewn together, I then made a hem for the arm holes.
And, finally, the top casing for the ribbon. I did this by folding the top edge about 1inch and then sewing across.


I fed the ribbon through the casing of the front and back of the dress, tying the ribbon on one side of the dress.
Looking forward to more sewing projects!


Saturday, July 16, 2016

KT Baked It: "Whatever I Can Find In My Kitchen To Make Cookies" Cookies

When I got home from work a few days ago, I needed to have cookies! Unfortunately we did not have any in the house at the ready. However, being a resourceful person, I was able to whip up some delicious cookies from what we had in the house.

What you need:
3/4 cup butter
1/2 cup white sugar
1/2 cup packed brown sugar
1 egg
1 tsp vanilla
1 1/2 cup flour
1 cup graham cracker crumbs
1 tsp salt
1 tsp baking powder
1/2 cup shredded coconut
1/3 cup each butterscotch, chocolate and white baking chips

In a large mixing bowl, cream softened butter with white and brown sugar.


Mix the egg and vanilla with the creamed sugar and butter.


In a separate bowel, mix the flour, graham cracker crumbs, salt and baking powder.


Using an electric mixer, slowly add the flour mixture to the creamed butter and sugar.


Add in the coconut and baking chips to finish the dough.


Now its time to bake! I used a tablespoon to scoop the dough and placed each cookie about 2" apart on a greased cookie sheet.

Bake the cookies in a preheated oven at 350 degrees for 12-14 minutes or until the sides are golden.


The cookies turned out great! This is a great basic dough to use for other additions like pieces of candy bars (snickers, peanut butter cups), M&Ms and chopped nuts too...mmmm!


Saturday, June 18, 2016

KT Did It: Rachel's First Birthday Party

Last weekend we celebrated our daughter, Rachel's first birthday party with family and friends. What a special day! There are so many cute ideas out there for first birthday decorations, themes, etc. I saved many of the decorations and party supplies from my baby shower with plans to use them for Rachel's first birthday party.


I made her a special 1st birthday party hat with scrap book paper and the left over tulle from what I used to make the wreath for her nursery.
I used fabric scraps to make a shabby chic high chair skirt.


For the table, I made a number one as part of the centerpiece to put next to her cake. I used cardboard to cut out the front and back of the number one. To make it three dimensional, I cut a paper towel roll into small pieces and sandwiched them in between the two sides. I used masking tape to wrap it and secure the two sides (paper mache would also have worked with modge podge and strips of news paper or magazines). I decorated the number with fabric strips and them made rolled fabric roses to put on the number. Look for the finished product below!


After my sister's baby shower, I knew that I wanted to make cupcake liners and cupcake flags for this part. I used floral and purple polka dot scrapbook paper to make the cupcake liners. For the flags, I used Microsoft Word to create the circles with the word "ONE" and number "1" on them - 6 of each for the 12 cupcakes that I bought. Yes - bought, I sold out of the homemade cupcakes. I hot glued the circles onto purple glitter paper, then cut them out leaving a border of purple paper using scalloped scrapbook scissors. I used the left over paper to hot glue a toothpick to each flag.

I also repeated the chocolate dipped Rice Krispie treats and chocolate dipped Oreos that I made for my sister's baby shower.


I also made a "Happy Birthday" sign using cardstock, hot glue and ribbon.

The final product was perfect!
Rachel had a wonderful birthday, we are so grateful for everyone who was able to attend and celebrate this special little girl with us!

Friday, May 6, 2016

KT Did It: It's a Boy! Baby Shower for My Sister

Hello all! I am so excited to be back on my blog sharing a new Did-It, especially something as special as this. Since my last post in March, I have been busy planning and preparing for a wonderful event: my older sister's baby shower. And it's a BOY! I was very honored that she let me host her baby shower, and I wanted to make it very special. My sister was a mermaid in another life, so it was fitting that her baby shower would be a nautical theme. Thank you Pinterest for all of the ideas and for giving birth (no pun intended), to Jessica's AHOY! It's a Boy! baby shower.
I started off looking for the perfect invitation.  I chose this blue and green invitation and matching party supply set by PartySparkle on Etsy. The next few weeks involved a lot of printing, cutting, and hot glue! I did a little bit at a time - one night I cut out cupcake liners, another night I made flags for the cup cakes, etc.

Once all of the paper was cut out and ready, I started to work on a few other crafts, decorations and party activities. I made my sister a Mommy-To-Be corsage using green, blue ribbons. Here is an easy tutorial for many a ribbon corsage for a baby shower by DIY Mommy. And here is the corsage I made for my sister, she loved it!
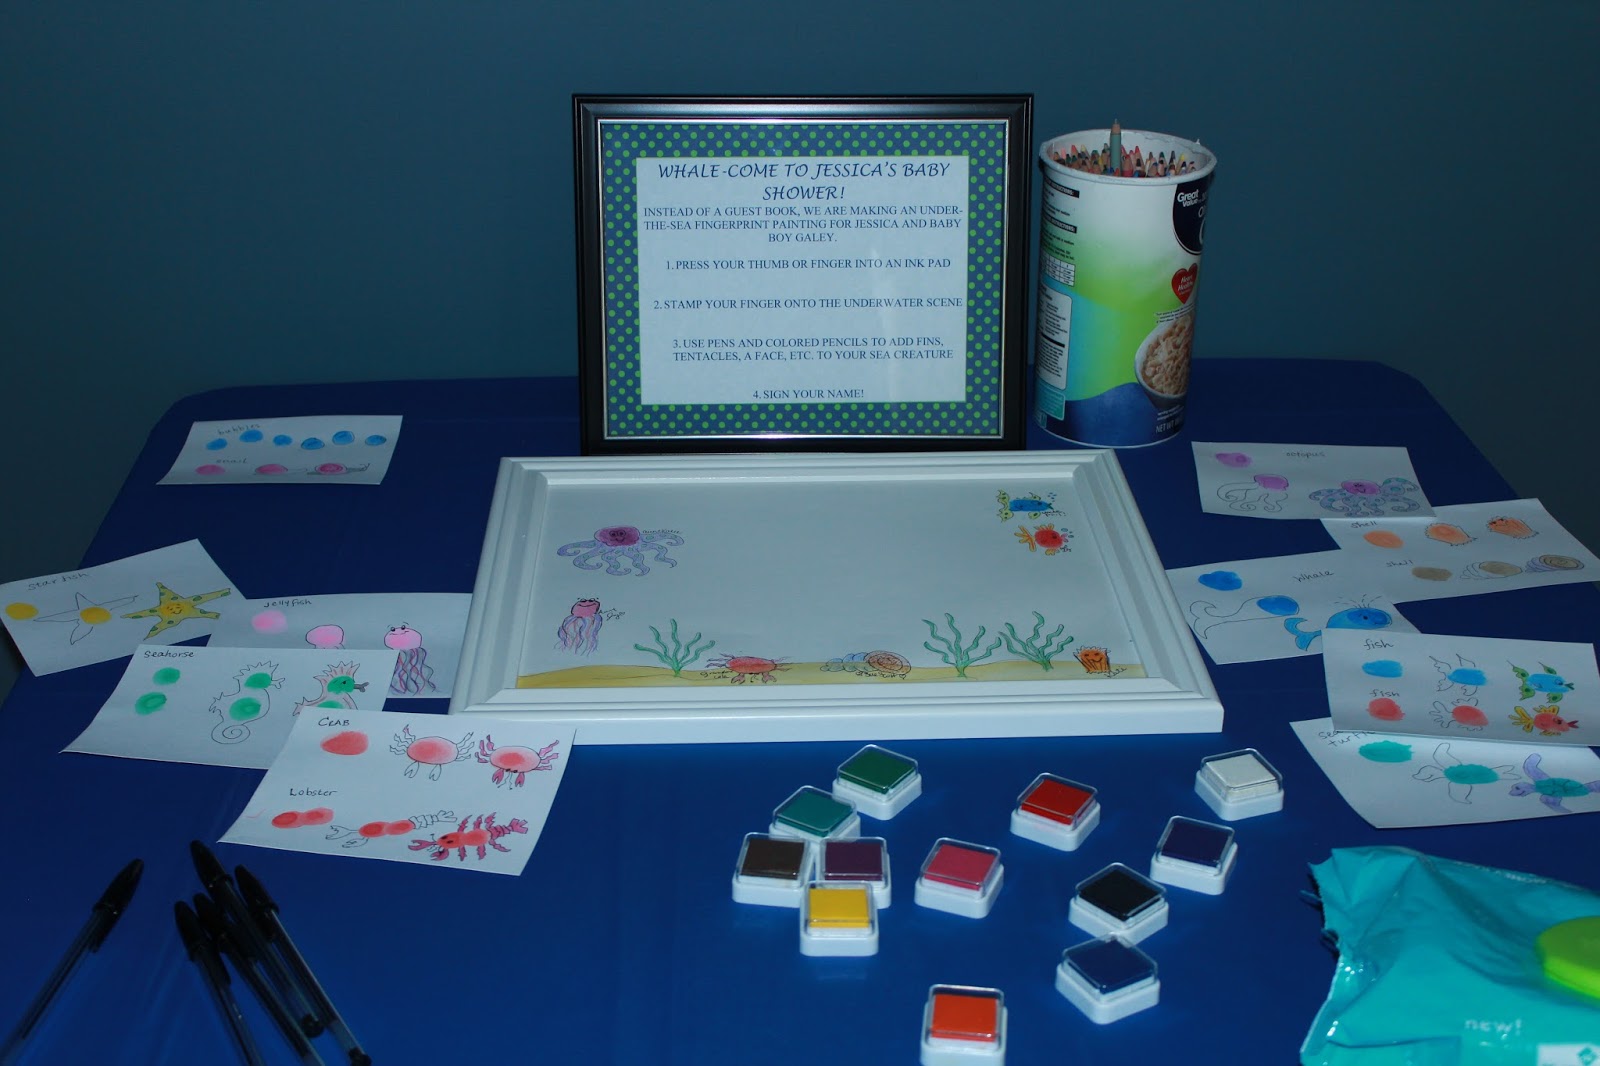
Next up were the activities for the shower. Thankfully my sister did not want to play any embarrassing games. Instead, I decided to have some crafting activities for the guests and Mommy-to-be to do. First, I made nautical themed alphabet prints for our guests to color with colored pencils, crayons and markers. For another station I made an underwater scene for guests to create fingerprint sea creatures and sign as the guest book. A third station was to write guesses about baby's name, birthdate, height and weight. I made paper onesies for guests to write their guesses and then hang with miniature clothes pin on a line which I created on a large frame. Finally, for decorations, I created a bunting banner with green and blue fabric to decorate the windows and railing.

Here is a glimpse of Jessica's baby shower! It was a huge success.
Here I am pinning on the corsage before the party! She loved it.


Here is the spread. My mom made the food, which was delicious as you would expect. We had a cheese tray with bread and crackers. There was homemade crab dip. For the main course, we had meatballs in marinara, Italian roasted chicken strips, a pasta salad and vegetable salad. Everything was scrumptious! And the spread looked pretty good too.


For dessert we served cupcakes (thank you Safeway bakery!) wrapped in matching cupcake liners and decorated with cupcake flags, all part of the baby shower package by PartySparkle that I cut and put together.  We also dipped rice krispie treats and oreos in blue and green chocolate melts, which was a fan favorite!


And, of course, the crafts! Here are some of the coloring pages that I made and printed on cardstock. They were beautifully colored by our guests. I am going to get them laminated and bound into a book for baby.


Here is the finger print guest book station.


For party favors, I cut out the matching chocolate wrappers and wrapped over 100 mini Hershey's chocolates and put them in party bags with some blue shark gummies and green round gummies.


Here is the bunting banner, which Jessica now has to decorate the nursery!


Love you so much, Jess! Cannot wait to meet baby boy!