Tuesday, November 22, 2016

KT Made It: A Few Thanksgiving Decorations

Only two days until Thanksgiving and the official kick-off of the Holiday Season! Excited this year to be hosting a few friends for dinner which gives me the opportunity to try some new recipes and decorate the apartment. Unfortunately time got away from me a little bit with regards to getting some new decorations, so in a pinch I made a few with items I had in the house (surprise, surprise!)

The first things that I made was a yarn wreath. These are all over my Pinterest feed, and they really are lovely. I used left over yarn that I've had from three Christmas' ago when I made a pair of fingerless gloves. I wrapped the yarn tightly around the wreath, reinforcing with hot glue occasionally along the way.


Next, I made flowers out of felt in various autumn colors (brown, tan, red, orange and yellow).


Finally, I used satin ribbon to hang the wreath on the front door!


Lucky for me I still had some leftover yarn. I decided to make a letter B out of cardboard, similar to the number 1 that I made for my daughter's birthday. I used cardboard from a box of diapers and then I took the cardboard inside of a few toilet paper rolls to put between the two sides to make the B three dimensional (my husband has not realized that there are missing parts of those toilet paper rolls yet!). I wrapped the B with yarn and decorated it with a few artificial leaves, then set it on the book shelf in our living room.


Last, but not least, I used water color and ballpoint black ink pen to make a little festive artwork to put on the book shelf.


Thursday, November 17, 2016

KT Baked It: Cherry Cheesecake Pie

Another birthday at work means another dessert to bake! This month's cake came with a special request for cherry pie or cherry cheesecake. Luckily I found a recipe to do both justice. This recipe came from Woman's Day, and it was very easy to make with few ingredients.

What you need:
1 box of premade pie dough (comes with two packages)
Two 8 oz. blocks of cream cheese, softened
1 egg
1/2 cup of sugar
1 Tbl corn starch
1 tsp vanilla extract
1 can of cherry pie filling

Preheat the oven to 350 degrees.

Unwrap one package of pie dough and line a 9 inch pie dish with the dough.

Next, make the cream cheese filling. In a mixing bowl, combine the corn starch and sugar. Beat in the cream cheese using an electric mixer. Then add in one egg and the vanilla.

Pour the cream cheese batter into the pie dish.

Top with the can of cherry pie filling.

Next, I made a lattice on top of the pie filling by cutting strips of pie dough on a sheet of wax paper.

I had about 1/3 of the remaining pie dough left which I cut into strips and braided.

I put the braid around the rim of the pie. I used an egg white and brushed the strips of dough over the top as directed in the recipe.

Bake the pie in preheated oven for 50-60 minutes or until the top is golden brown and the pie filling is bubbling.

Voila! This was delicious. I think it would also be good with a pumpkin filling or maybe blueberry. Great for a Thanksgiving dessert too...

Tuesday, November 8, 2016

KT Made It: Satin Ribbon Flower Clip


After a year and a half of living in our apartment, I finally made the opportunity to go through my craft desk (i.e. the pile of all of my craft and art supplies piled in an entirely organized way onto, beneath and around my desk in our study.) In doing so, I realized that I have a lot of supplies that have been sitting around unused with no craft to call a home. Ribbon, felt, fabric, watercolor paint, ink, beads all collecting dust. Around the same time I started going through my boards on Pinterest where I had over 1000 pins of ideas and projects that I have never attempted. Well that ends today! I set a new goal to make one craft a month (yes, we aren't being overly ambitious) using my craft supply stock to attempt to make one of my Pinned projects.


This month's craft is from my Ribbon and Bows board. I made this board thinking I was going to make Rachel a bunch of cute headbands and hair bows when she was a newborn. Needless to say, she is still waiting for those hair accessories! Well, wait no more, Rachel! This satin flower was easy to make.

What you need:
1 1/2inch satin ribbon
Matching thread, sewing needle
Felt
Hairclip
Hot glue

Cut seven pieces of ribbon, each 5 inches long. I used a lighter to set the edges to prevent them from fraying.


Take one piece of ribbon and fold like so. I pinned the bottom together to prevent it from unfolding. Do this for all seven pieces of ribbon. These are the petals.


Next, use a long strand of thread and your needle to gather the petals onto the same strand of thread. Make sure to knot the end of the thread so that you don't pull it through! After you have finished the stitches through all of the petals, gather the stiches by pulling the petals together on the strand of thread. Sew the sides of the end petals together to create a circle of ribbon petals.


I made a second flower that was smaller using 3 inch long pieces of ribbon. I put the second, smaller flower onto the first. I then glued a pearl bead into the middle of the flower. Finally, I attached the flower to a hair clip using hot glue and a felt circle.


Wednesday, November 2, 2016

KT Made It: Ombre Bridal Shower Cake

I have been wanting to make an ombré cake for quite some time. In fact, I intended to make one for Rachel's first birthday, but I was in a time crunch by the time I actually made the cake and I knew it was going to be a little time consuming so I opted not to. Luckily for me, the opportunity finally presented itself when our office threw a bridal shower for one of our coworkers in October!

So what is an ombré cake? Ombré cakes are colorful cakes in which the colors used are graduated from light to dark; this may refer to the colors frosting the outside of the cake and/or the layers of the cake. The frosting can be decorated in various ways as well. Here are a few examples.
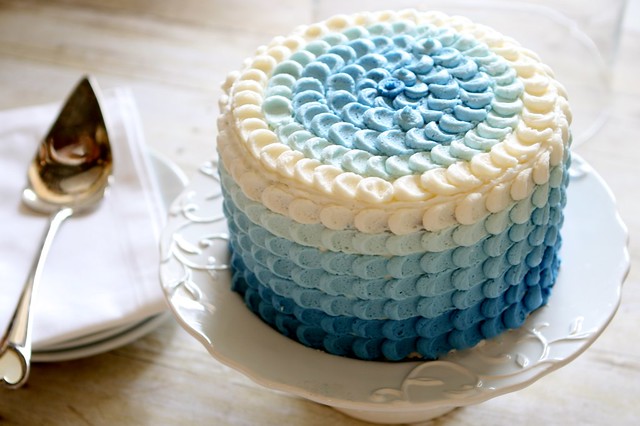
Blue Ombre Petal Cake

From the Hungry Housewife with a great tutorial.

This fancy one I found on Best Friends For Frosting

And my personal favorite - the ombré rose cake. This one is by BS in the Kitchen.

Aren't these so pretty? So I decided to make a purple cake for the Bridal Shower, as the bride's wedding palate was purple and gray. Since I was in a time crunch (there's a trend here), I used white cake mixes by Betty Crocker for the cakes. I made four 6 inch cakes, each cake was a different gradient - the first was white, the second light purple, then a little darker...then a little darker.

I made a buttercream frosting using unsalted butter, confectioners sugar, a small amount of heavy whipping cream and a little vanilla extract.

I frosted the top of the white cake first, then placed the light purple cake as the next layer, frosted the top, then the next cake, etc. Once stacked, I frosted the outside of the cake with the white buttercream.


Then it was time for frosting! I used a large star shaped frosting decorating tip for the swirls, starting with white buttercream swirls around the bottom layer of cake. I slowly added a little bit of purple food coloring to slowing increase the gradient of the frosting swirls going up the cake. Finally, I topped the cake with a cake topper that I made using purple cardstock and tooth picks. Voila!


The cake was delicious and the bride-to-be was thrilled!

Congratulations, Morgan - may God bless your marriage with love, laughter and a lifetime of happiness!

Saturday, October 15, 2016

KT Baked It: Chocolate Cherry Cheesecake

Happy October! The holiday season is right around the corner, which means its almost time for the annual holiday baking and crafting festivities.

I've been getting some exercise for the baking muscle over the past month. I recently volunteered to bake a cake for a co-worker's birthday - a chocolate raspberry cake. It turned out pretty good, and since I have become the Birthday Cake Baker for the office. No pressure. Two of my co-workers did not get birthday cakes for their special day this past spring, and there became a joke in the office that they were the only people who did not have a cake. So, as a surprise, I made them each a belated birthday cake! My co-conspirator in the office discretely asked them what kind of cake they like to give me some suggestions. One likes cherry cheesecake and the other likes "anything but cheesecake."

With a little creative liberty, I decided to make a chocolate cherry cheesecake for our office manager and a white cake with strawberry whipped cream filling for our surgical scheduler. The cherry cheesecake recipe comes from Betty Crocker. I can count the number of cheesecakes I have made in the past on one hand. The last time I made one was for Thanksgiving, and it turned out fairly good. I've always found cheesecakes to be a little frustrating to make, let alone perfect (I wouldn't know though, none of mine have been perfect). The issues I run into are (1) the crust and (2) knowing when it's done. I ran into the same issues this time, not surprisingly, but it turned out delicious none the less.

What you need:
2 cups chocolate cookie crumbs - I used chocolate teddy graham crackers that were processed in my mini food processor.
3 Tbl butter, melted
4 packages (8oz each) cream cheese, softened
3 eggs
3/4 cup sugar
1/2 tsp almond extract
1 cup whipping cream, divided in half
1 can cherry pie filling (20 oz)
1 cup semisweet chocolate chips

Okay, to start off you make the crust. I used the food processor to turn my teddy grahams into crumbs first. Combine the crumbs and butter well and then press into the bottom and up the sides of your springform pan. The recipe called for a 10" pan, but I only had a 9" so that's what I used. I baked my crust in the over at 325 degrees for about 10 minutes, but the recipe did not require that.


Next is the filling. Beat softened cream cheese using an electric mixer first, then add the eggs one at a time beating the mixture after each addition. Then beat in the sugar and almond extract, and finally add in 1/2 cup of whipping cream.


Time to fill the crust with the filling. Spoon 3 1/2 cups of the cream cheese filling into the crust-lined pan. Evenly spoon 1 cup of cherry pie filling over the cream cheese layer.


Looking good! Now spoon the rest of the cream cheese filling over top. Time to bake! I baked the cheesecake at 325degrees for 1hr and 20 minutes, and then allowed the cake to cool in the oven with the door ajar for an hour.


Once the cake was cooled, it was time for the chocolate glaze. In a saucepan, bring 1/2 cup whipping cream to a gentle boil over medium head. Remove from heat and stir in 1 cup of semisweet chocolate chips.


Place the cheesecake on a sheet of waxed paper and remove the sides of the pan. Spread the chocolate glaze over the cooled cake. Wow!


I refrigerated the cake overnight uncovered, then it was ready to take to work. Served with a little whipped cream and a spoonful of the left over cherry pie filling, it was quite delicious!


Here is the second cake, which was a boxed white cake mix baked in two 6" round pans. I make whipped cream frosting with whipping cream (2cups) and confectioners sugar (1/2cup). The filling between the layers was whipped cream and diced strawberries combined with granulated sugar.


Sunday, August 28, 2016

KT Cooked It: Sweet and Sour Brussel Sprouts

Today is the end of my first week of training for the Shamrock Marathon Weekend in Virginia Beach on March 18-19. Only 29 more weeks to go before I finish my goal of completing a marathon before my 30th birthday. Trying to train, work and be mommy/wifey is going to take a lot of preparation, sleep, and well, good nutrition (minus a few glasses of wine here and there...and maybe a doughnut or two). So on this episode of "What Can I Make That's Healthy Using Whatever Is In My Kitchen," I took a 2 pound bag of Brussel sprouts waiting to be cooked from the fridge and whipped up this delicious dish. The idea comes from a dish that my older sister makes - shredded Brussel sprouts, corn and black beans sautéed with a sauce that she purchases from her local Wegmans.

Luckily I had the sprouts and corn, but I had to make my own sauce. First I shredded the Brussel sprouts using these instructions that I found on Popsugar.

For the sauce, I combined the following ingredients in a small sauce pan and brought to a gentle boil before taking off the stove top:
  • 1/4 cup Ken's Steakhouse Balsamic Vinaigrette Dressing
  • 1/4 cup lite sodium soy sauce
  • 1/4 cup brown sugar
  • 1/2 tsp ground ginger
Alright! Next, in a large skillet I sautéed the Brussel sprouts mixed with one can of whole kernel corn in 2 Tbl of olive oil until tender. This would have been even better in a wok. Add that to the Christmas list.


Finally, I added the sauce and sautéed for another 2 minutes or so, mixing well. And that's it. SO good. Next time I will make sure to have a can of black beans on hand!

Sunday, August 21, 2016

KT Baked It: Oatmeal Quick Bread

It's time for another episode of using "whatever I can find in my kitchen to make baked goods"! Today I decided to use a trio of over ripe bananas that my hubby stashed in the freezer for me a few weeks ago knowing that I would someday try to make something out of them. The best thing to use ripe bananas for is banana bread, no doubt. Today I decided to try to make a healthier banana bread that I would not feel so guilty about eating for breakfast. I adapted this recipe from a no flour, sugar free oatmeal muffin recipe by Bren Did. It turned out great!

What you need:
2.5 cups Quaker rolled oats
3 over ripe bananas
2 eggs
1/2 cup almond milk
1/4 cup maple syrup
2 tsp vanilla
2 tsp baking powder
1 tsp salt
1 tsp cinnamon
1/2 tsp nutmeg
1/2 tsp ginger

Preheat your oven to 350 degrees. Toast the rolled oats in the oven on a cookie sheet for 6 minutes.


Take 1 1/2 cups of oats and chop them in a food processor until they are about the consistency of flour.


In a medium mixing bowl, combine the oatmeal, baking powder, salt and spices.


In a separate mixing bowl, mash the bananas until there are no lumps. Using frozen bananas helped when it came to mixing. I microwaved the bananas in their peels until they were completed thawed, then mashed them well.


Then I added the remaining wet ingredients.


Add the dry ingredients to the wet mixture and then allow the oats to "soak" for about 10 minutes.


Put the batter into a greased 9x5 inch bread pan and bake at 350 degrees for 45 minutes.


Cool and serve!